
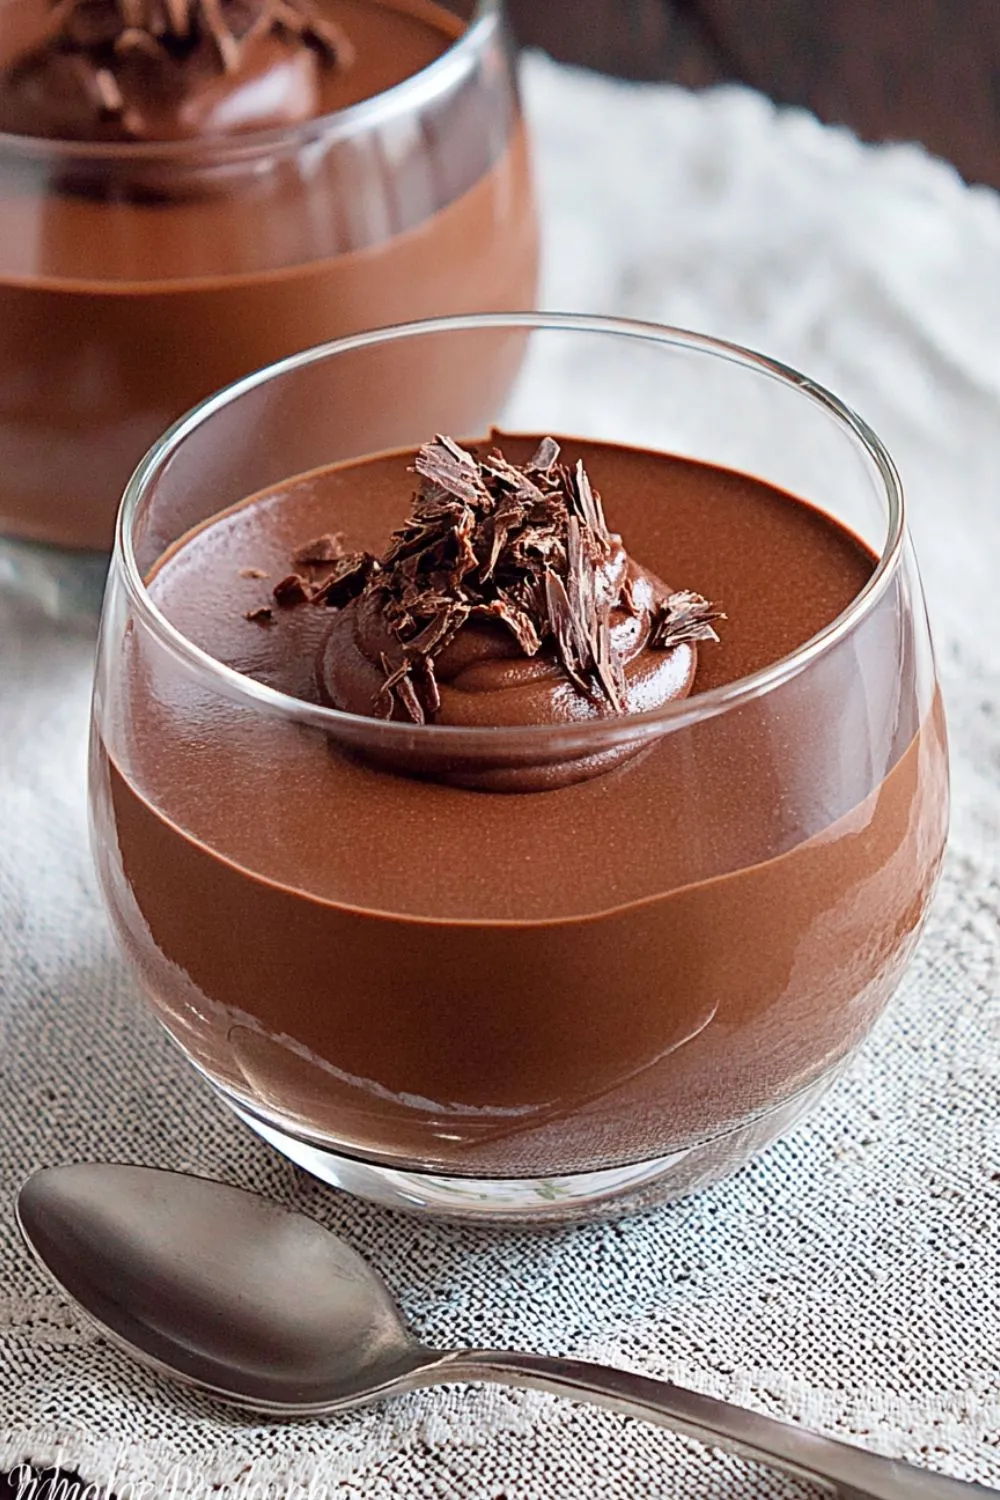
There’s something magical about a homemade chocolate pudding recipe that instantly takes me back to my childhood. It’s not just a dessert; it’s a warm hug in a bowl! Whether you’re juggling work, kids, or both, this quick and easy recipe is a lifesaver for those busy days. When I whip this up, it feels like I’m treating my family to something special without spending hours in the kitchen. Trust me, every creamy bite will make you feel like a culinary superstar, and your loved ones will thank you for it!
Why You’ll Love This Homemade Chocolate Pudding Recipe
This homemade chocolate pudding recipe is a delightful blend of simplicity and flavor. It’s perfect for busy moms like us who want to whip up something delicious in no time. With just a few ingredients and minimal prep, you can create a comforting dessert that feels indulgent. Plus, it’s a crowd-pleaser! Your family will be clamoring for seconds, and you’ll bask in the joy of their smiles.
Ingredients for Homemade Chocolate Pudding Recipe
Gathering the right ingredients is half the fun of making this homemade chocolate pudding recipe! Here’s what you’ll need:
- Milk: The base of our pudding. Use whole milk for a rich flavor, or opt for low-fat milk if you’re watching your calories.
- Sugar: This sweetens the pudding. You can substitute granulated sugar with coconut sugar for a different twist.
- Cocoa Powder: Unsweetened cocoa powder gives that deep chocolate flavor. Make sure it’s good quality for the best taste.
- Cornstarch: This thickens your pudding to that perfect creamy consistency. You can use arrowroot powder as a substitute if needed.
- Salt: Just a pinch enhances the flavor of the chocolate.
- Vanilla Extract: Adds a warm, aromatic note. If you have vanilla bean, use it for an extra special touch!
- Butter: This brings richness and a silky finish to the pudding. A dab of cream can be an alternative for a decadent twist.
For those who want to get creative, feel free to add a splash of your favorite liqueur for an adult version, or a handful of chocolate chips for extra indulgence. You’ll find the exact quantities to create this deliciousness at the bottom of the article, ready for printing!
How to Make Homemade Chocolate Pudding Recipe
Now that we have our ingredients, let’s dive into making this delightful homemade chocolate pudding recipe! Follow these simple steps, and you’ll be savoring a bowl of creamy goodness in no time.
Step 1: Whisk Dry Ingredients Together
Start by grabbing a medium saucepan. In it, combine the sugar, cocoa powder, cornstarch, and salt. Whisk these dry ingredients together thoroughly. This step is crucial! Mixing them well helps ensure your pudding has a smooth texture without lumps. Just imagine a beautiful chocolate pudding, silky and rich—this simple whisking sets the foundation for that dream.
Step 2: Incorporate Milk Gradually
Now, it’s time to add the milk. Pour it in slowly while whisking constantly. I can’t emphasize this enough! This gradual incorporation prevents those pesky lumps from forming. You want a smooth, velvety mixture. Picture a flowing river of chocolate as you whisk! Keep that arm moving, and soon you’ll have a perfectly blended base.
Step 3: Cook Until Thickened
Next, place your saucepan over medium heat. Stir the mixture continuously as it cooks. You’ll notice it starting to thicken. This is the magic moment! Once it begins to bubble, keep stirring for another minute or two. The pudding should coat the back of a spoon. It’s like a warm chocolate blanket—so comforting!
Step 4: Add Butter and Vanilla
Remove your saucepan from the heat. Now, stir in the butter and vanilla extract. The butter adds a luscious richness, while the vanilla enhances the flavor beautifully. It’s like the cherry on top of a sundae! Stir until everything is melted and smooth. Your kitchen will smell divine, and you’ll know you’re almost there!
Step 5: Transfer to Serving Dishes
Carefully pour the pudding into your chosen serving dishes. To avoid spills, consider using a ladle or a measuring cup with a spout. This way, you can pour it gently, like a delicate waterfall. The sight of that glossy chocolate pudding filling the dishes is enough to make anyone’s mouth water!
Step 6: Chill Before Serving
Finally, it’s time to chill! Cover the pudding with plastic wrap, pressing it directly onto the surface to prevent a skin from forming. Refrigerate for at least two hours. Chilling allows the flavors to meld beautifully and gives you that perfect, creamy texture. It’s the anticipation that makes the first bite even sweeter!
Tips for Success
- Always whisk the dry ingredients thoroughly to prevent lumps.
- Use a heavy-bottomed saucepan for even cooking.
- Don’t rush the cooking process; constant stirring is key.
- For a richer flavor, consider using whole milk or adding a splash of cream.
- Let the pudding chill properly to enhance its creamy texture.
Equipment Needed
- Medium saucepan: A heavy-bottomed pan is best for even heat.
- Whisk: Essential for mixing ingredients smoothly. A fork can work in a pinch!
- Measuring cups and spoons: For precise ingredient measurements.
- Serving dishes: Any small bowls will do for serving the pudding.
Variations on Homemade Chocolate Pudding Recipe
- Nutty Delight: Add chopped nuts like walnuts or almonds for a crunchy texture and a nutty flavor.
- Mint Chocolate: Incorporate a few drops of peppermint extract for a refreshing twist.
- Spicy Chocolate: Stir in a pinch of cayenne pepper or cinnamon for a warm kick.
- Vegan Option: Substitute milk with almond or coconut milk and use a plant-based butter alternative.
- Dark Chocolate: Use dark cocoa powder or chocolate for a richer, more intense taste.
- Fruit Infusion: Top with fresh berries or banana slices for a fruity contrast to the chocolate.
Serving Suggestions for Homemade Chocolate Pudding Recipe
- Top with a dollop of whipped cream for added richness.
- Sprinkle chocolate shavings or cocoa nibs for a decorative touch.
- Serve alongside fresh berries for a burst of color and flavor.
- Pair with a glass of cold milk or coffee for a delightful contrast.
- Consider adding a mint sprig on top for a refreshing finish.
FAQs about Homemade Chocolate Pudding Recipe
As a passionate home cook, I know that questions often pop up when making a homemade chocolate pudding recipe. Let’s tackle some of the most common ones!
Can I use alternative sweeteners in this pudding?
Absolutely! You can substitute granulated sugar with alternatives like honey, maple syrup, or even stevia. Just remember that liquid sweeteners may require adjustments to the milk amount.
How do I store leftovers?
Store any leftover pudding in an airtight container in the refrigerator. It will stay fresh for up to three days. Just remember to cover it well to avoid that pesky skin forming on top!
Can I make this pudding ahead of time?
Yes! This homemade chocolate pudding recipe is perfect for making ahead. Prepare it a day in advance, and let it chill overnight for a more intense chocolate flavor.
What can I use instead of cornstarch?
If you don’t have cornstarch on hand, you can use arrowroot powder or even all-purpose flour. Keep in mind that the texture may vary slightly, but it will still be delicious!
Can I freeze chocolate pudding?
While you can freeze it, the texture might change upon thawing. For the best experience, I recommend enjoying it fresh or chilled instead of frozen.
Final Thoughts on Homemade Chocolate Pudding Recipe
Making this homemade chocolate pudding recipe brings such joy, doesn’t it? The process is simple, yet the outcome is so rewarding. Each creamy spoonful transports me back to cherished memories, filled with laughter and love. It’s not just about satisfying a sweet tooth; it’s about creating moments of togetherness. Whether enjoyed after dinner or as a late-night treat, this pudding offers comfort in the chaos of daily life. So, gather your ingredients, whip up this delight, and watch as it transforms your kitchen into a haven of happiness. Trust me, every bite will be worth it!
Print
Homemade chocolate pudding recipe that delights every bite!
- Prep Time: 10 minutes
- Cook Time: 10 minutes
- Total Time: 2 hours 20 minutes
- Yield: 4 servings 1x
- Category: Dessert
- Method: Stovetop
- Cuisine: American
- Diet: Vegetarian
Description
A rich and creamy homemade chocolate pudding that is easy to make and delightful in every bite.
Ingredients
- 2 cups milk
- 1/2 cup granulated sugar
- 1/3 cup unsweetened cocoa powder
- 1/4 cup cornstarch
- 1/4 teaspoon salt
- 1 teaspoon vanilla extract
- 2 tablespoons butter
Instructions
- In a medium saucepan, whisk together the sugar, cocoa powder, cornstarch, and salt.
- Slowly add the milk while whisking continuously to prevent lumps.
- Cook over medium heat, stirring constantly until the mixture thickens and begins to boil.
- Remove from heat and stir in the butter and vanilla extract until smooth.
- Pour the pudding into individual serving dishes or a large bowl.
- Cover with plastic wrap, pressing it directly onto the surface of the pudding to prevent a skin from forming.
- Refrigerate for at least 2 hours before serving.
Notes
- For a richer flavor, use whole milk or add a splash of cream.
- Can be topped with whipped cream or chocolate shavings before serving.
- Store any leftovers in the refrigerator for up to 3 days.
Nutrition
- Serving Size: 1 serving
- Calories: 200
- Sugar: 24g
- Sodium: 100mg
- Fat: 6g
- Saturated Fat: 3g
- Unsaturated Fat: 2g
- Trans Fat: 0g
- Carbohydrates: 35g
- Fiber: 1g
- Protein: 4g
- Cholesterol: 15mg


Comments and Reviews
Comments are closed.